A place to start.
With a new hobby comes investing time and money in the tools necessary to get what you want done. I started this hobby back in 2014 and of course I learned that I needed to source and invest in a lot of tools, tools that I never would have ever thought to ever invest in but it is definitely well worth it. Since my uncles have plenty of tools, I was able to "borrow" some of these tools and never return them. The rest I purchased in person or through various websites. Here is a detailed list of the tools I sourced to begin my journey as a diecast customizer.
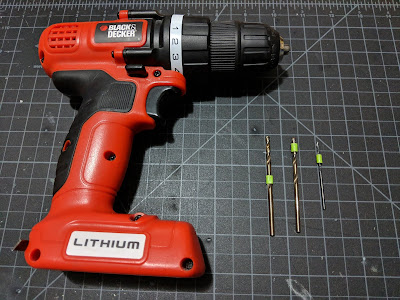
Drill and Drill Bits
The drill and these drill bits will be used to break the casting free from its base by removing the original rivet(s) that come from the factory. Make sure to know the material of the casting that you are drilling because if it happens to be plastic, you may drill through and even drill your own hand.
 |
1/8", 9/64", and 5/64" drill bits
|
1/8" is used to make a guide hole on the rivet for the 9/64"
9/64" is the bit that will remove the rivet ring that keeps the casting stuck to the base
5/64" is used to clean up the inside of the rivet so that you can re-tap and re-seal the casting to the base with 2-56 screws.
2-56 Tap
This tool will help re-attach your the casting you are working on to its base by allowing 2-56 screws to be screwed in to where the factory rivets are located.
 |
T-handle for the 2-56 tap
|
Screwdrivers
 |
0.050" Allen-head screwdriver and pocket flat-head screwdriver
|
 |
0.050" Allen screwdriver close-up
|
You can use your preferred type of screw, but I prefer to use button head to keep my castings together.
2-56 Button Head Screws
These are the different size screws I use, each size has a specific purpose:
3/16" is mainly used for regular sized cars
1/4" is used for larger vehicles like pickups and other trucks
1/2" is what I mainly use to secure my customs to displays stands which I will go over on another tutorial.
Pliers and Diagonal Cutters
 |
Diagonal cutters, pliers without a cutter
|
The diagonal colors are used to cut off any excess or unnecessary pieces but mainly used to cut the brass rods so that you can make the new axles a perfect length. The pliers without a cutter will be used to make the ends of the axles, acting as "lug nuts"; so that the new wheels you swapped in will stay on the new axles. More details on this in the next tutorial.
Precision Modelling Files
 |
Tamiya and Army Painter
|
These aren't used very often during wheel swaps although there are some occasions where you will need to use them. I mainly used to clean up the casting's factory separation points, especially before repainting, which I will highlight in the next tutorial. I use Army Painter for the larger areas and since the Tamiya set has a finer grit, I use those for a smoother finish.
Hammer and Marker
The hammer will be used to hammer down the brass rod ends to act as your new lug nuts for your new axles and wheels. The marker is used to mark where to cut the axle so that you know where to cut the axle for that perfect fitment.
0.032 Brass Rods
 |
| 0.032 brass rod |
 |
| Factory Packaging |
These brass rods will be used to act as your new axles for your wheels swaps. As mentioned earlier, you will cut and hammer these to get the length and look you want to accentuate the new look of your diecast car.
Did you get all of that?
Hopefully this article helped you get an idea on what it takes to get started on customizing diecast cars. If I'm missing anything, please let me know on the comments below.
In case you want that list again, here it is. Just scroll up to see what they were used for.
-Drill
-5/64 drill bit
-1/8 drill bit
-9/64 drill bit
-2-56 right-handed tap
-T-handle or grip for the 2-56 tap
-2-56 button head screws 3/16", 1/4", 1/2" in length (my preference)
-0.050 Allen key (my preference)
-Pocket or small flat-head screwdriver
-Diagonal "dyke" cutters
-Precision cutters
-(Needle nose) pliers without cutters
-0.032 brass rods
-Hammer
-Precision/modeling files
-Fine point sharpies
-Self-healing cutting mat
Now you're ready to crack your casting open and start with a basic wheel swap. Stripping and re-painting needs more tools as well so that list of additional tools will come along with a detailed tutorial. I am also working on tutorial videos so keep checking back.
Don't forget to follow me on all social media platforms for consistent updates and new customs. You can click any of the links in the homepage or search: @pd9customs or Paul Dalusong.
-Paul Dalusong


No comments:
Post a Comment